HTML Editor and Form Guidelines
SiteLink offers this quick reference for common HTML editor functions,
along with links to our online help and webinars on HTML
letters.
All SiteLink forms are available in two formats: standard rich
text format (RTF) and HTML. You choose which format to use for each form
on the Form Setup screen. RTF forms are simple and
reliable. HTML forms are more colorful and can make for
more professional presentations, but take more skill to design.
After reading this guide, if you do not feel comfortable using the
SiteLink HTML editor for your letters, you should contract with a
web or graphics designer for assistance.
About HTML
HTML is the language of the internet. It is used within SiteLink
to allow you to send professional looking, web page style e-mails to your
customers. For example, use HTML letters in your SiteLink CRM
marketing campaigns, or to send past due notices with a “Pay Now” button
linked to your website.
SiteLink Templates Makes HTML Easy - Part 1
The SiteLink HTML editor is an easy to use, basic editor that
supports ALL of the features you will need to create or edit HTML letters
and forms. Additionally, we provide two HTML templates that are nearly
ready to go: 1) a letter template for normal SiteLink notices, such as a
past due notice or an invoice, and 2) a CRM template for email
marketing such as a birthday Card or a welcome letter.
You
can quickly edit the text any of the HTML templates by simply copy and pasting
text from your existing RTF letters.
Images are added to HTML letters as
hyperlinks. You will need to upload an image to your logo to your website
server or other internet location, then add the link from the
Insert>>Image menu item of the SiteLink HTML Editor. Your images
will not be hosted on SiteLink servers; uploading images is something you or
you web designer will have to do.
SiteLink Templates - Part 2
The letter template comprises four sections which are in order: a) a
header table for your logo link and site address, b) a title table, c) a tenant
address table, and d) letter body of text. Since the layout and
addresses are designed to fit an A9 windowed envelope, we suggest that you do
not move or resize them. Instead, you should resize you logo to fit into
the template header table size. Our sample template uses a logo
image sized at 80x194 pixels. The size of your logo file should be
limited to a physical size of no more 1"x3" to fit in a standard windowed
envelop. SiteLink provides a tool for resizing images under the editor
Graphics>>Image Resize menu item.
Tables have cells. For
instance, the header table contains your left justified logo in one cell and
your right justified site address in an adjacent cell.
At the beginning
of each template is a cascading style sheet (CSS) defining the look and
formatting of the letter. For a consistent presentation, it is
recommended that you do not edit this HTML source code.
See our online help for detailed instructions on updating our
SiteLink Templates.
Hyperlinks!
In HTML letters you can add links to the internet just like
a webpage. The SiteLink HTML editor allows you to insert
links within the text of your letter, or a link to an image within
a letter from the Insert>>Hyperlink menu item. Insert
links in Edit Mode then test them in Preview Mode.
Click on
the examples below in Preview Mode to take you to more extensive
help on our website.
![]() Click on this logo image in Preview Mode to see instructions on
images.
Click on this logo image in Preview Mode to see instructions on
images.
Click on this Help link for our online help
Consult with your web developer for more ideas. on how to use hyperlinks.
Images within Letters
One of the reasons for using HTML is to add images to your forms and letters. Tbe SiteLink HTML editor makes it easy to add an image. Images can be added by using Insert>>Image menu item.
 Then, add borders to your images from the Insert Image
dialog.
Then, add borders to your images from the Insert Image
dialog.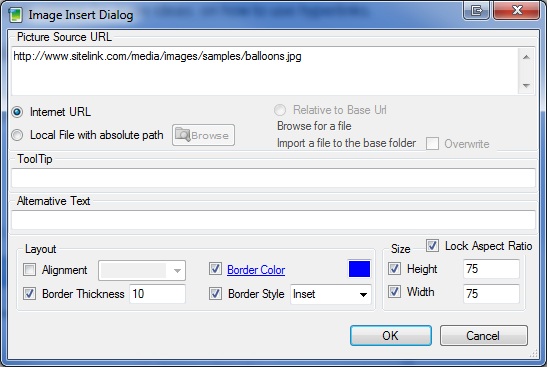
Hosting Images
Just like your website, the images must be uploaded to a server on the
internet before then can be linked to and seen by your
customers. You’ll need your web developer to help set this up. Your
images will not be hosted on SiteLink servers.
You have a number of
options for hosting images used in SiteLink letters and forms. The best
option would be to place them on the same server as your
webpage. Your web developer would be able to assist you with
this. A second option would be your internet service providor (ATT or
Road Runner for examples). Most ISP's will provide a limited amount of
storage space on their servers with your account. A third option would
be to use a photo hosting service such as Photobucket.com. We cover all
these options in more detail on our website.
See our
online help for more information on using images within your SiteLink letters
and forms.
Printing and Formatting HTML Forms
HTML is designed to be dynamically resized for displays. With
care, it can also be formatted for your printed letters and forms. Just
remember that an HTML form generally stretches to fit the page width. You
can take direct control over how a form will look printed but that requires the
experience of an HTMLweb page designer. Alternatively, the SiteLink
templates we provide should give good results. Try to use the
SiteLink templates with minimal changes, or get your web developer can help
with designing or modifying these forms for you.
Before deploying
forms to your facilities, be sure to test printing them.
Margins
When printing, HTML forms use the web browser features built into Windows, just like printing from Microsoft Internet Explorer. The page margins are determined by your computer web brower settings, not from SiteLink. We provide a link within the editor (under the File>>Page Setup menu item) to allow you to change the printed margins. The SiteLink template forms are setup to e 0.5 inch margins for left and right borders.
Page Numbers
You may see page numbers or a title line on your forms when printing. Page
numbers an margins are set on the same dialog as margins (under the
File>>Page Setup menu item) . We recommend setting all header and
footer segments to Empty, just as shown below.
Note that changing these
settings will affect printing from Internet Explorer. Also, changing
print settings within Internet Explorer will change how Sitelink prints as
well.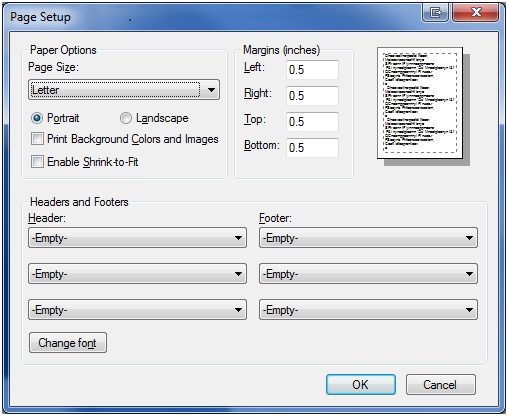
Page
Breaks
To make page breaks easy for you, SiteLink recognizes the special character
sequence #pb when printing. Add this sequence to any form that you plan
to print and need a page break.
Importing HTML Forms and Letters
If you desire features that are not apparent in the SiteLink HTML editor, you
can create HTML forms in another editor and copy the source into the SiteLink
HTML editor from the View>>HTML Source menu item.
Tables within Forms and Letters
Tables are an important and powerful tool in laying out information within your HTML letters and forms. Our template letters make extensive use of tables. For example, our template header in our sample form has two columns. Notice in the example below how the two columns can contain very different information and can be formatted differently. The logo is left justified in the first table column and the site information is right justified in the second column. Having two columns on a page is a common use for tables within a form.
|
While the SiteLink HTML editor provides some tools for working with tables, making full use of tables requires more experience in HTML than we expect from most of our users. Your web developer is the best source for help on HTML.
Our template letters often contain a table of the charges for a tenant associated with by a keyword such as < Tenant.ChargesTable> as shown below. The SiteLink template forms include the most common tables with the corresponding headers and footers to allow you to include these in your own form. To re-use these tables in another form, simply highlight the desired block, copy it to the clipboard, and paste it in.
| Date | Description | Charge | Tax | Payment | Balance |
|---|---|---|---|---|---|
| <Tenant.ChargesTable> | |||||
| Total Due | <Tenant.BalanceCurrent> |
| Unit | Date | Item/Service | Amount | Tax | Due |
|---|---|---|---|---|---|
| <Invoice.ItemsTable> | |||||
| Subtotal | <Invoice.SubtotalDue> | ||||
| Taxes | $<Invoice.TaxesDue> | ||||
| Balance Due | $<Invoice.BalanceDue> |